Welcome to my tech blog — where I break down the latest smartphones, wireless earbuds, and must-have gadgets with honest, in-depth reviews.
I’m Debasis, a tech enthusiast focused on real-world performance, sound quality, ecosystem comparisons, and whether a product is actually worth your money. From Android vs Apple debates to deep dives into noise cancellation and audio tuning, you’ll find practical insights without the hype.
https://www.youtube.com/@TheDebasisPaul
Get link
Facebook
X
Pinterest
Email
Other Apps
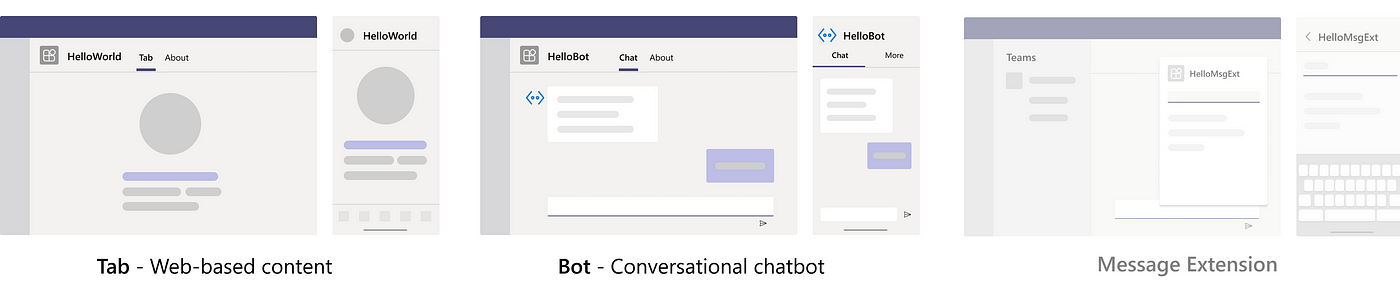
Build your first app using Blazor
Article Developer (Beginner) 9 minutes to complete 5 contributors
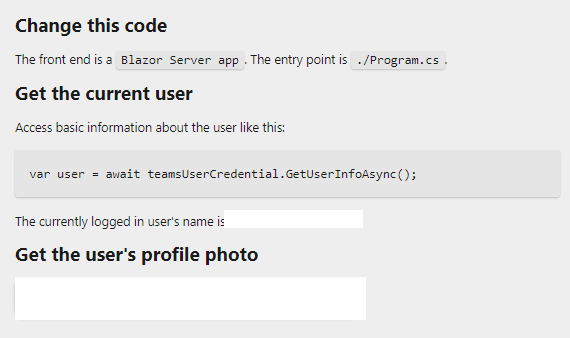
Blazor lets you build interactive web UIs using C#, instead of JavaScript.
You can create a tab app and a bot app with Blazor and the latest version of Visual Studio.
Note Currently, Teams Toolkit doesn’t support the message extension capability.
Prerequisites
8 minutes remaining
Here’s a list of tools you require for building and deploying your app.
Visual Studio Enterprise 2022 Preview (version 17.2.0 preview 2.1). Microsoft Teams to collaborate with everyone you work with through apps for chat, meetings, call — all in one place.
After you’ve installed the required tools, set up the development environment.
Install Microsoft Teams Toolkit
The Teams Toolkit helps simplify the development process with tools to provision and deploy cloud resources for your app, publish to the Teams store, and more. You can use the toolkit with Visual Studio, or as a CLI (called teamsfx).
You can use the latest version of the Visual Studio to develop Teams apps with Blazor Server in .NET.
To install the Microsoft Teams Toolkit extension:
Download the latest version of the Visual Studio.
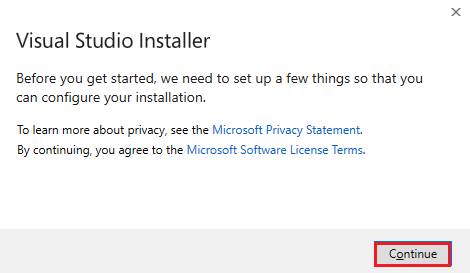
Open vs_enterprise__3bed52501a604464b1eff2ce580fd4eb.exe from your download folder.
Select Continue in the Visual Studio Installer page to configure your installation.
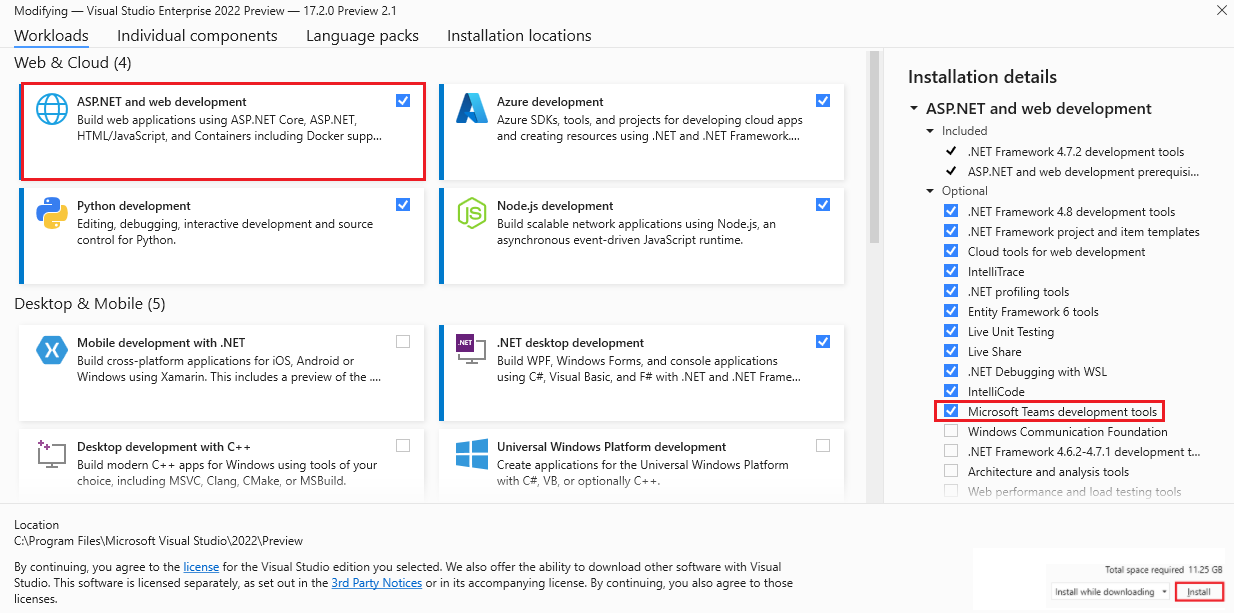
Select ASP.NET and web development under workloads.
Select Microsoft Teams development tools.
Select Install.
Your Visual Studio is installed in a few minutes.
Set up your Teams development tenant
A tenant is like a space, or a container for your organization in Teams, where you chat, share files, and run meetings. This space is also where you sideload and test your app. Let’s verify if you’re ready to develop with the tenant.
Enable sideloading option
After creating the app, you must load your app in Teams without distributing it. This process is known as sideloading. Sign in to your Microsoft 365 account to view this option.
Do you already have a tenant, and do you have the admin access? Let’s check if you really do!
Verify if you can sideload apps in Teams:
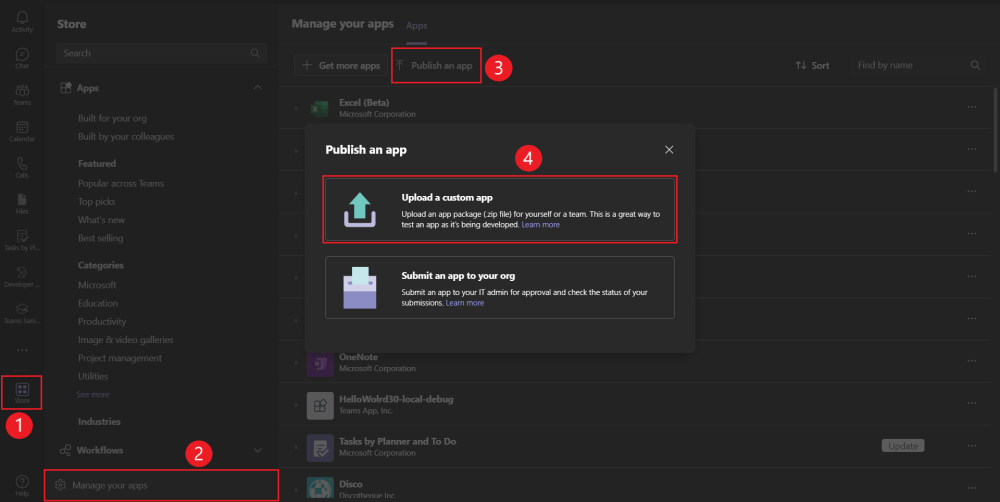
In the Teams client, select Store icon.
Select Manage your apps.
Look for the option to Upload a custom app. If you see the option, sideloading apps is enabled.
Note If Teams doesn’t show the option to upload a custom app, connect to your Teams administrator.
Create a free Teams developer tenant (optional)
If you don’t have a Teams developer account, you can get it for free. Join the Microsoft 365 developer program!
Use Teams Toolkit to create your first project. The toolkit takes you through a series of pages to create and configure your Teams app project:
Creating a new project page: You select the project type.
Configure your new project page: You enter the project details.
Create a new Teams application page: You select the Teams app capabilities.
To create your tab project workspace
Open the latest version of Visual Studio.
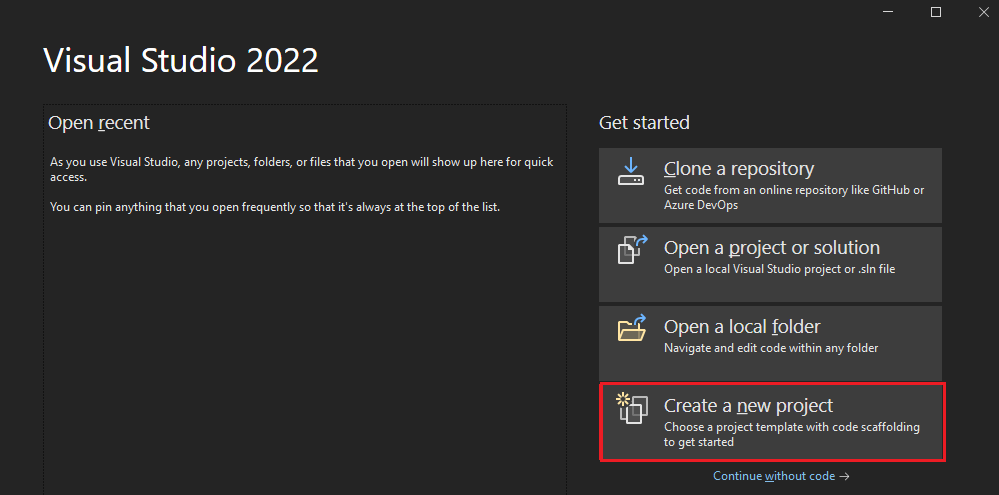
Select Create a new project.
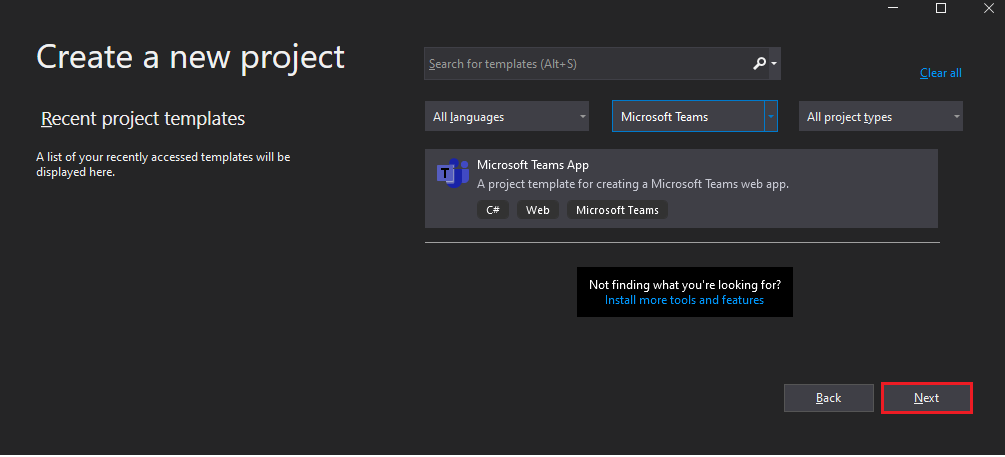
The Create a new project page appears.
Select the project details.
Select the project type:
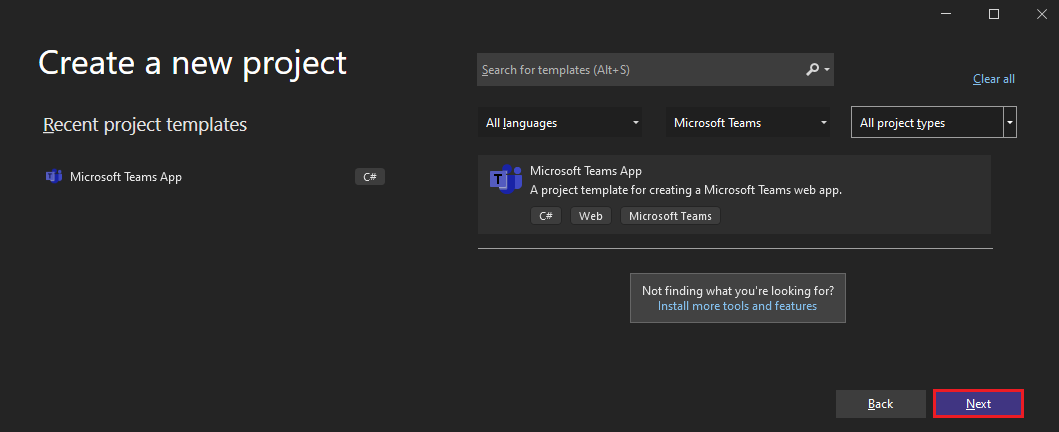
Select Microsoft Teams from All platforms dropdown list.
Select Microsoft Teams App as the template.
Select Next.
The Configure your new project page appears.
Configure the new project details.
Select the following project configuration:
Enter a suitable name for your project.
Note You can note that the project name you enter is automatically filled in as the Solution name also. If you want, you can change the solution name with no affect on project name.
Select the folder path where you want to create the project workspace.
Enter a different solution name, if you want.
Check the option to save the project and solution in the same folder, if you want. For this tutorial, you don’t need this option.
Select Create.
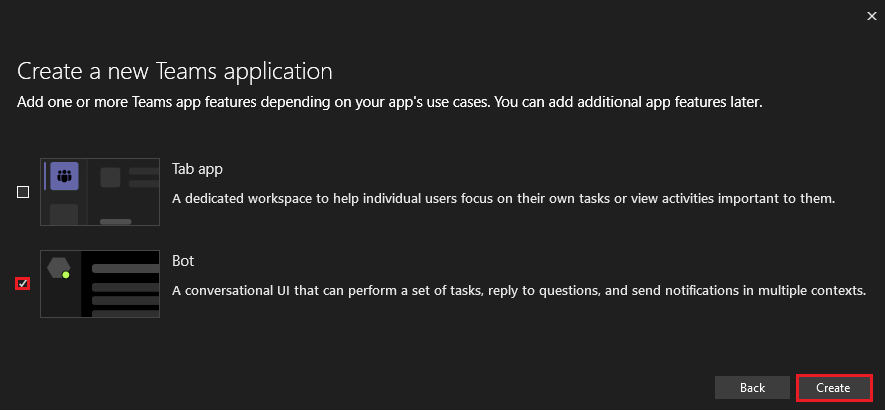
The Create a new Teams application page appears.
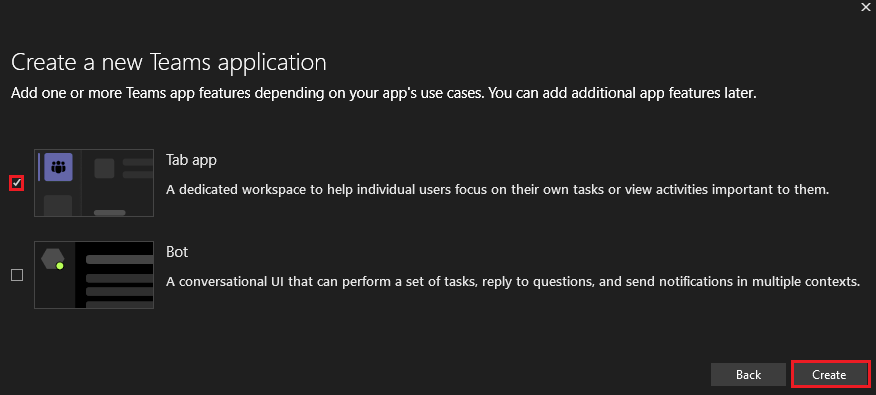
Select Teams app feature.
Select app feature:
Select the Tab app as the capability for your app.
Select Create.
Your Teams tab app is created in a few seconds.
A quick recap of creating a Teams tab app.
Take a tour of the source code for Teams tab app
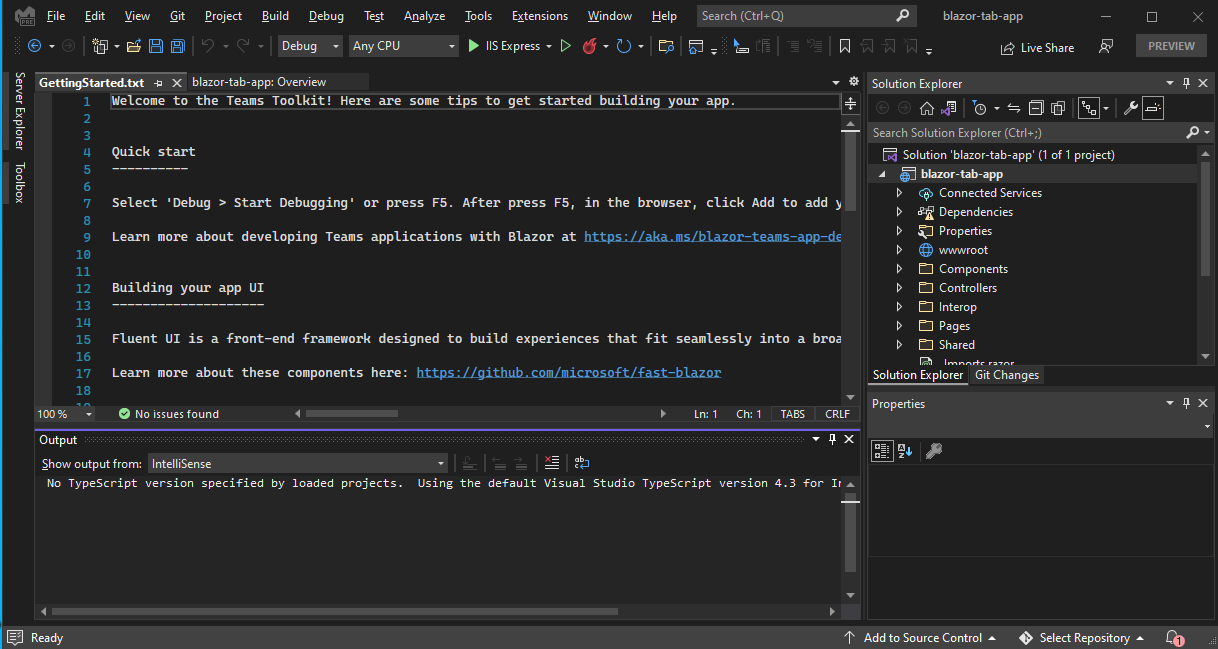
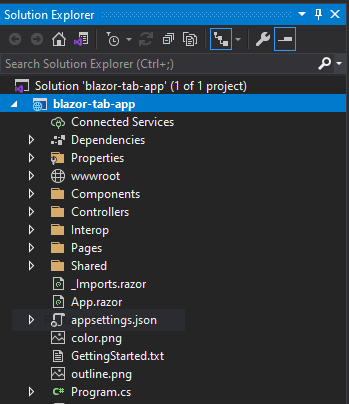
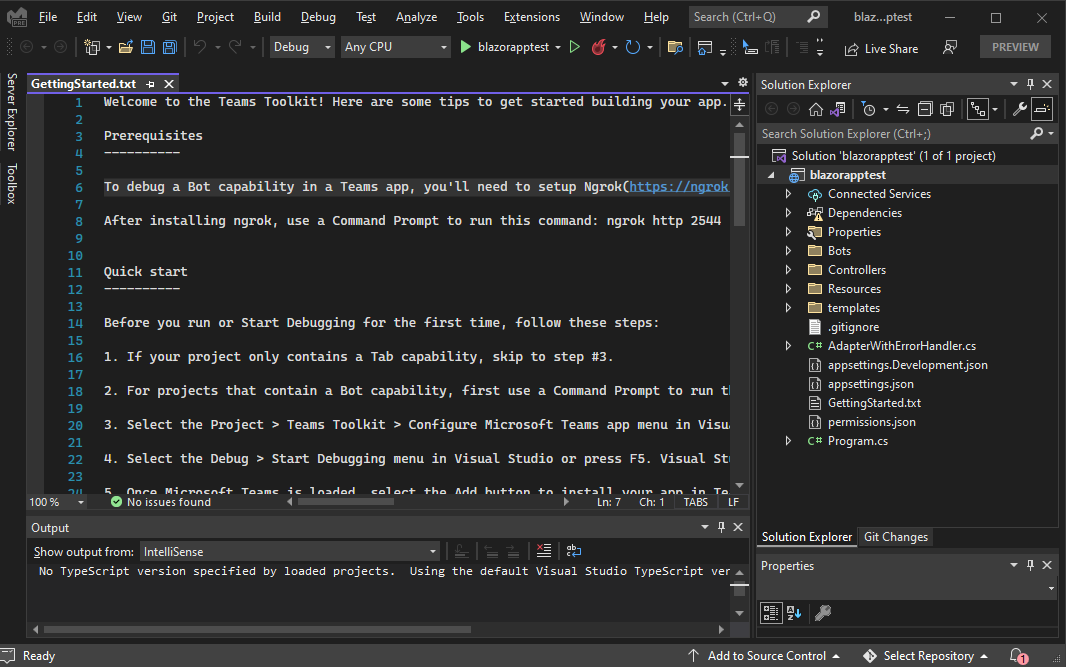
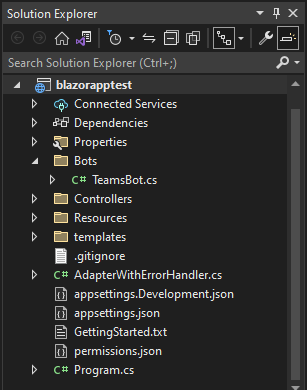
After project creation, you have the components to build a basic personal app. You can view the project directory structure in the Solution Explorer area of the latest Visual Studio.
Teams Toolkit creates a scaffolding for your project based on the capabilities you selected. Among other files, Teams Toolkit maintains:
Folder name Contents
App icons The app icons are stored as PNG files in color.png and outline.png.
Properties/manifest.json The app manifest for publishing through the Developer Portal for Teams is stored inProperties/manifest.json.
Controllers/BackendController.csA backend controller is provided in Controllers/BackendController.cs for assisting with authentication.
Pages/Tab.razorThe app manifest for publishing through the Developer Portal for Teams is stored in Properties/manifest.json.
TeamsFx.cs and JS/src/index.jsThe content is used for initializing communications with the Teams host.
You can add backend functionality by adding other ASP.NET Core controllers to your application.
Build and run your first Teams tab app
6 minutes remaining
After you set up your project workspace with Teams Toolkit, build your tab project.
To build and run your app:
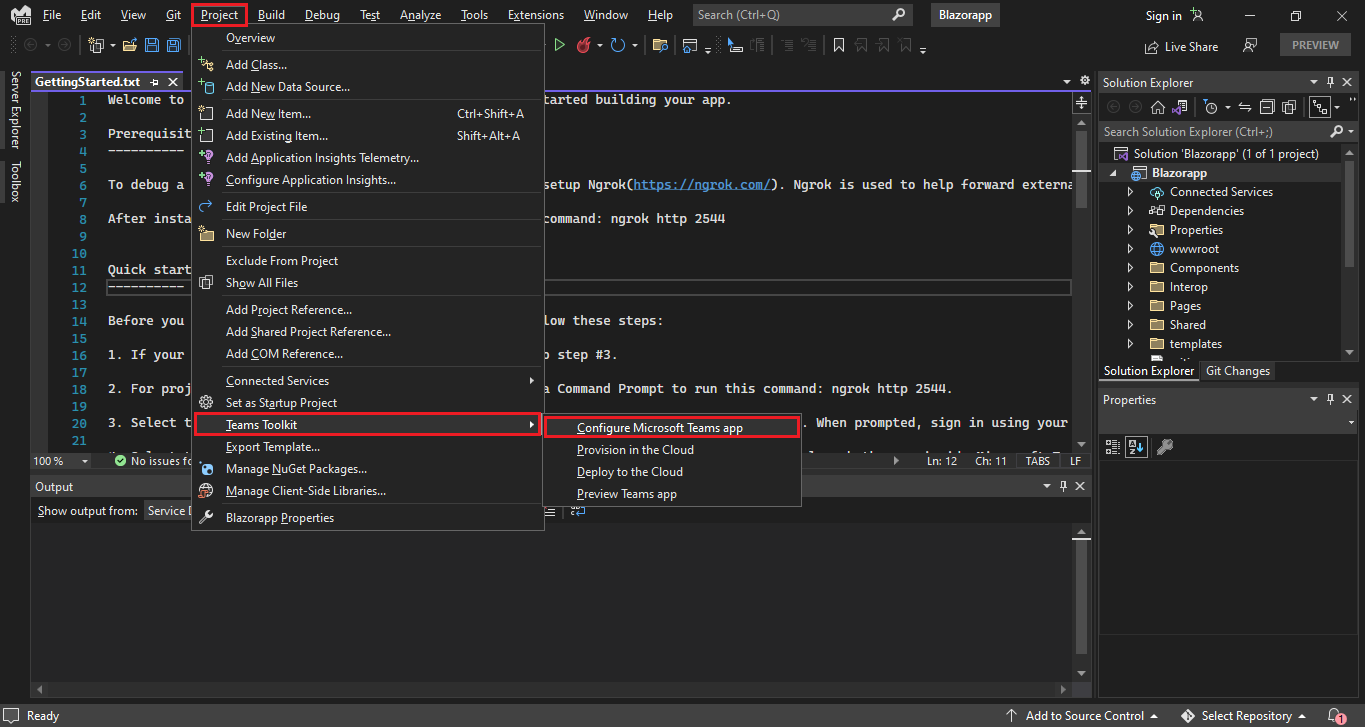
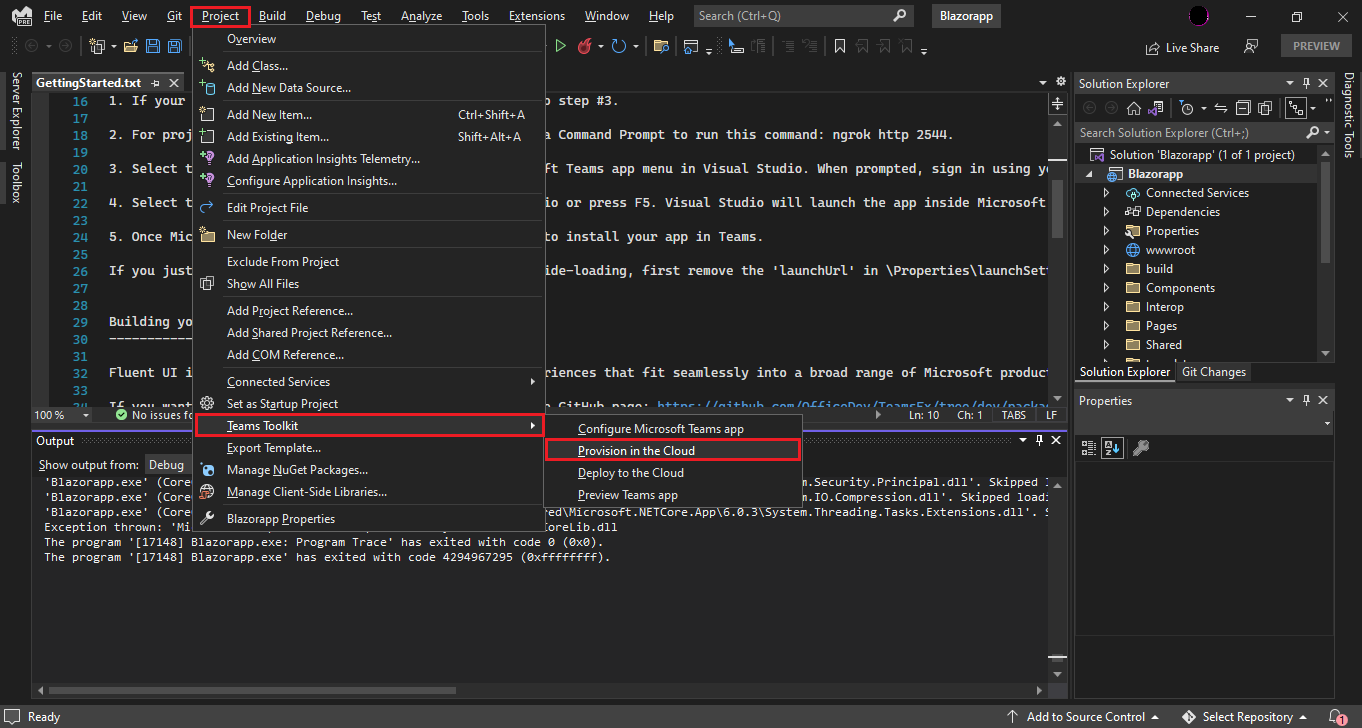
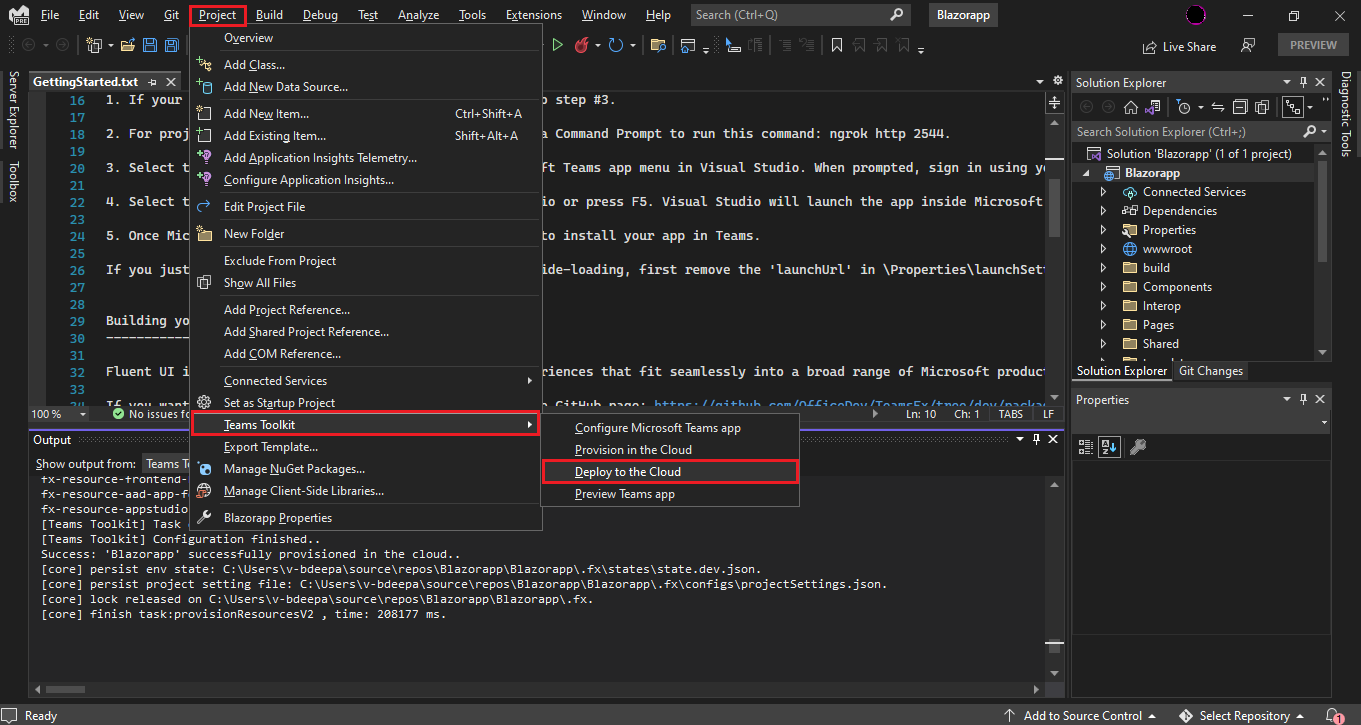
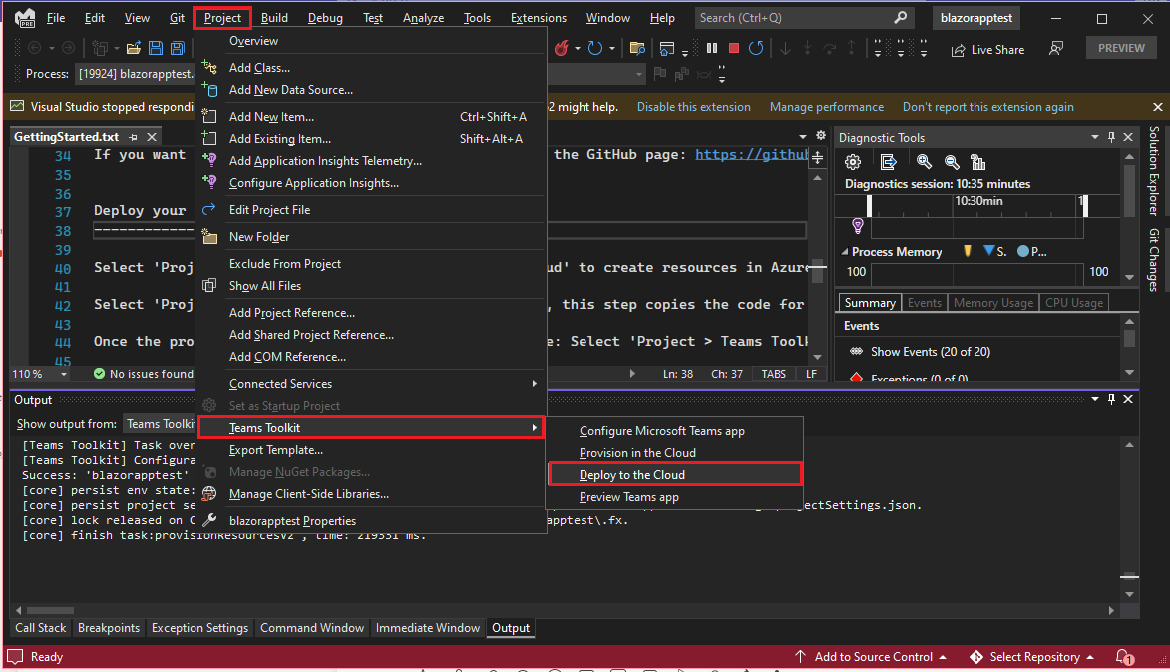
Select Project > Teams Toolkit > Configure Your Microsoft Teams.
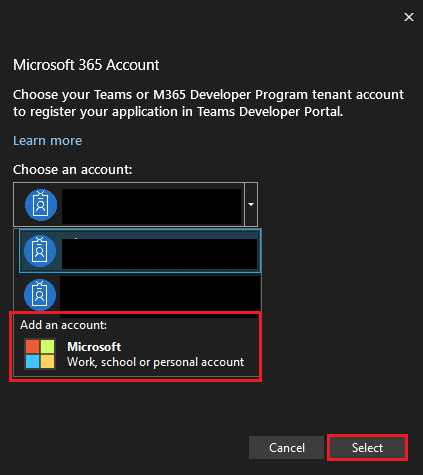
Select your Microsoft 365 account or Add an account to sign in.
Select Debug > Start Debugging or select F5 to run your app in debug mode.
Learn what happens when you run your app locally in the debugger.
When you select F5, Teams Toolkit:
Registers your application with Azure Active Directory.
Registers your application for “sideloading” in Teams.
Starts your application backend running locally.
Starts your application front-end hosted locally.
Starts Teams in a web browser with a command to instruct Teams to side load the application (the URL is registered inside the application manifest).
Install the self-signed SSL certificate for local debugging, if requested.
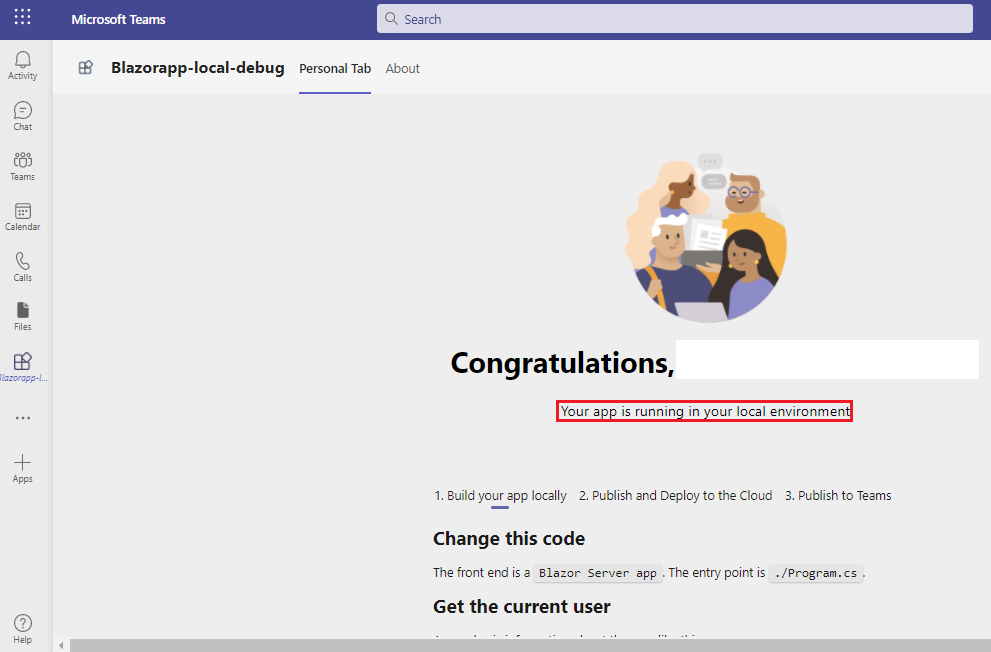
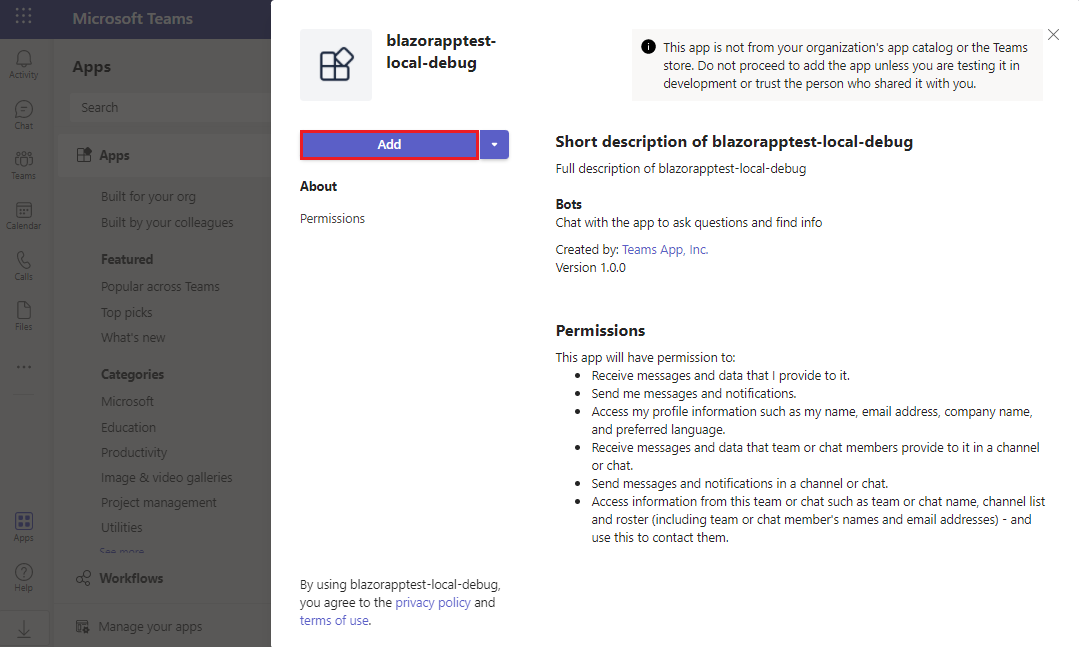
Teams is loaded in a web browser.
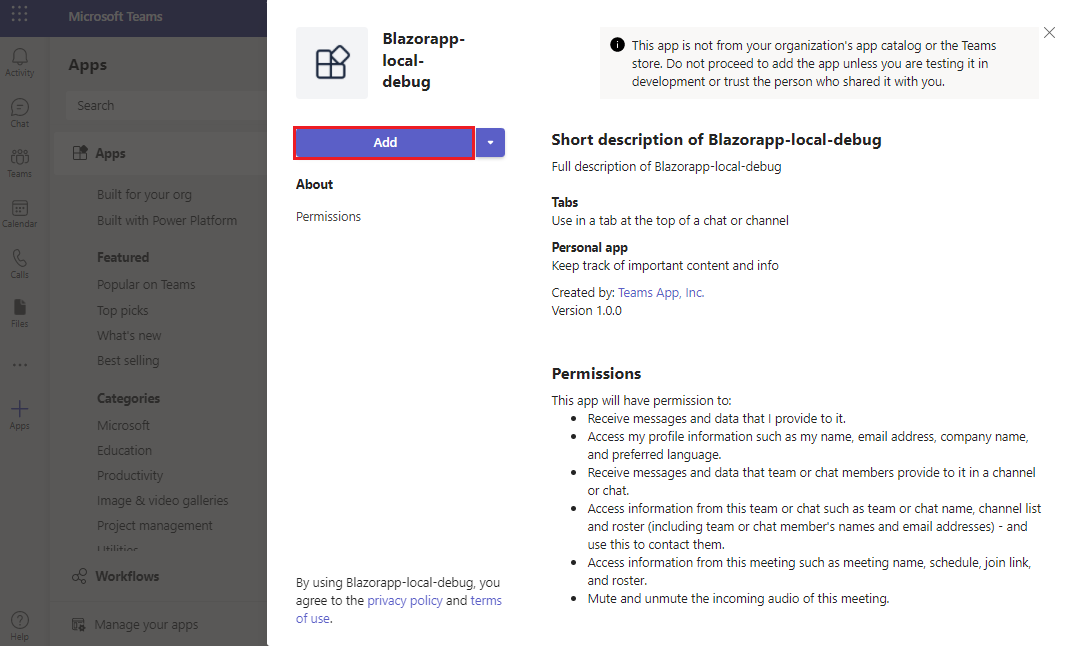
Select Add when prompted to install the app to Teams.
Congratulations, your first tab app is running in your local environment!
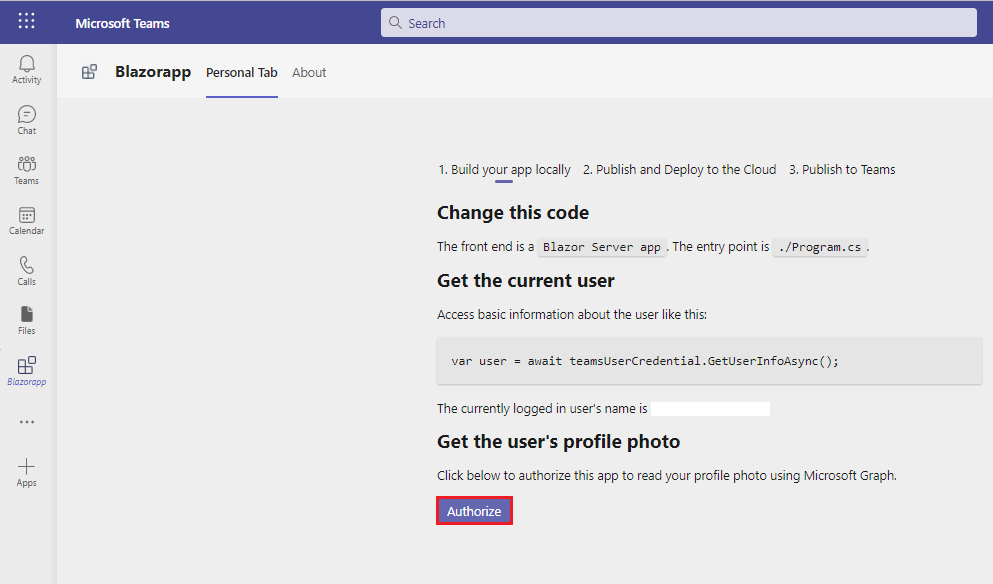
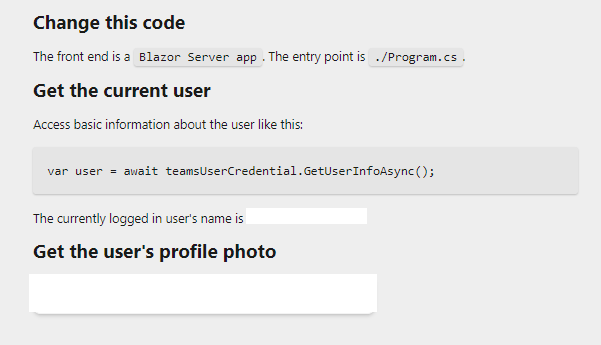
Move through the page to view the user details.
Select Authorize to let your app retrieve user details using Microsoft Graph.
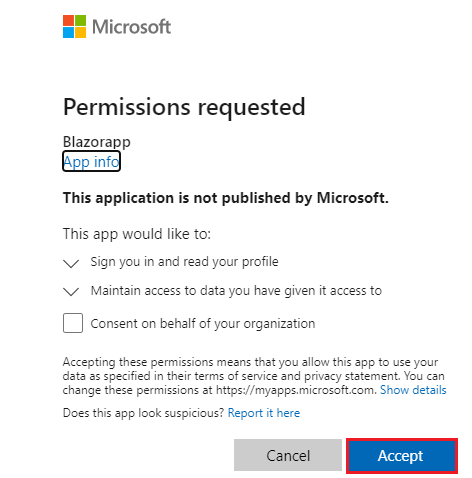
The app requests permission to grant access for displaying user details.
Select Accept to let your app access user details.
Your photograph and details appear in your Personal Tab.
You can do normal debugging activities, such as setting breakpoints, as if it were any other web application. The app supports hot reloading. If you change any file within the project, the page will be reloaded.
Learn how to troubleshoot if your app doesn’t run locally.
To run your app in Teams, you need a Microsoft 365 development account that allows app sideloading. You can learn more about it in the Prerequisites section.
Preview your first Teams tab app
5 minutes remaining
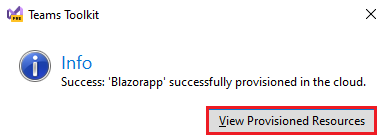
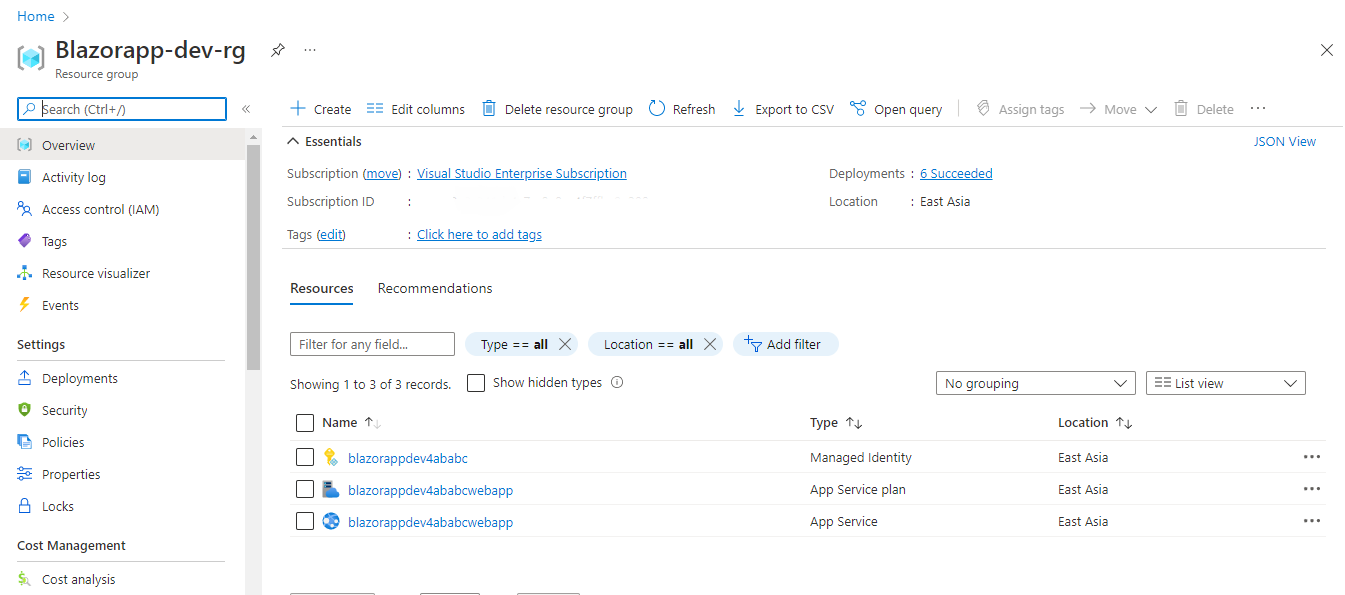
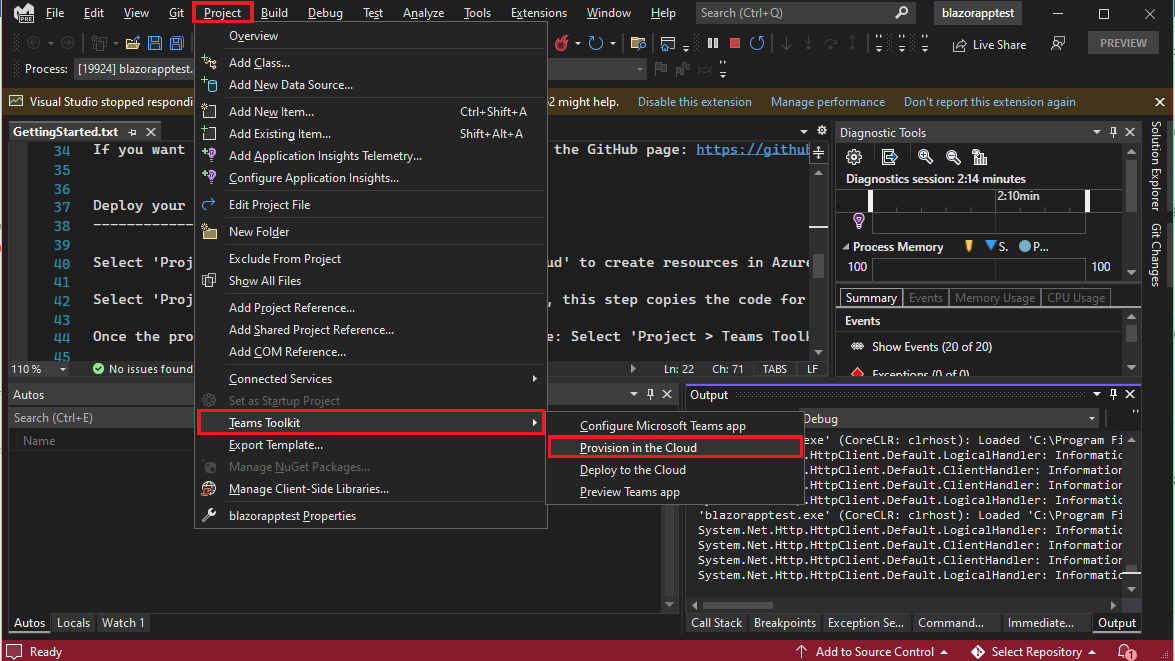
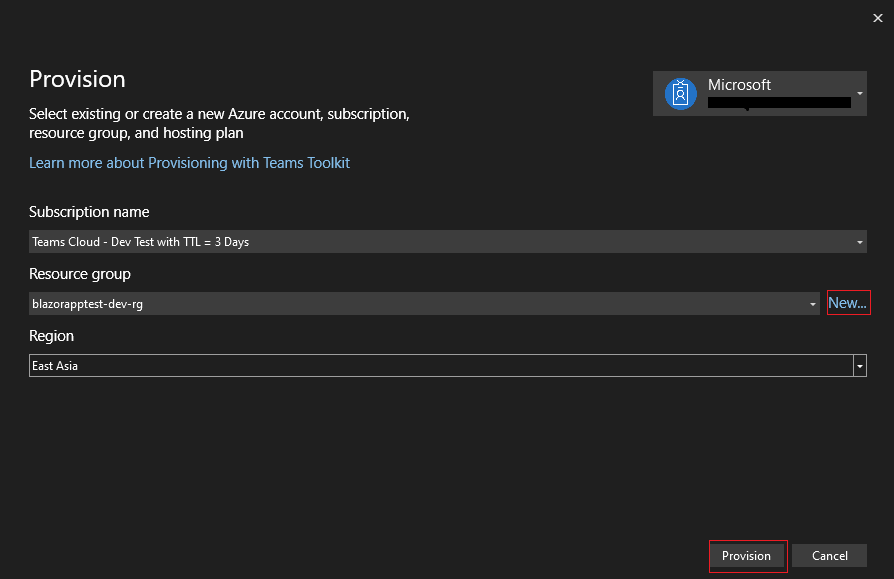
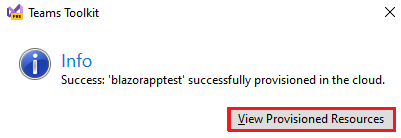
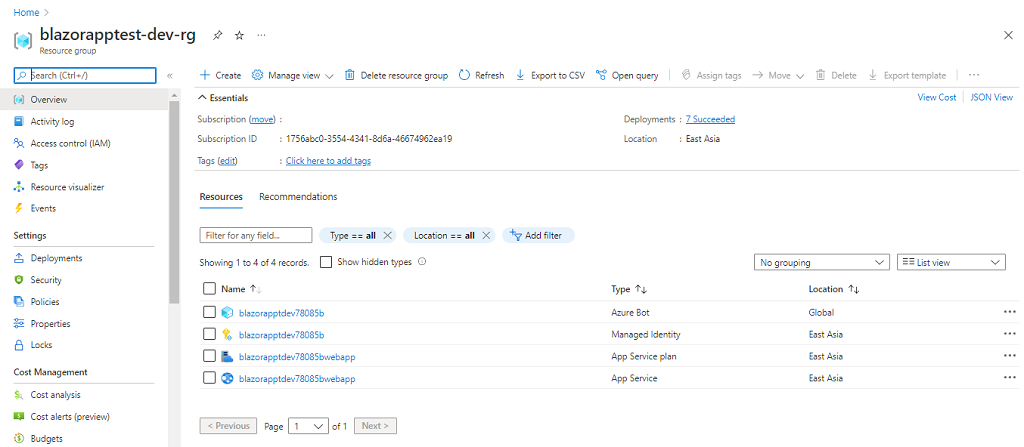
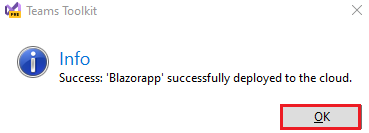
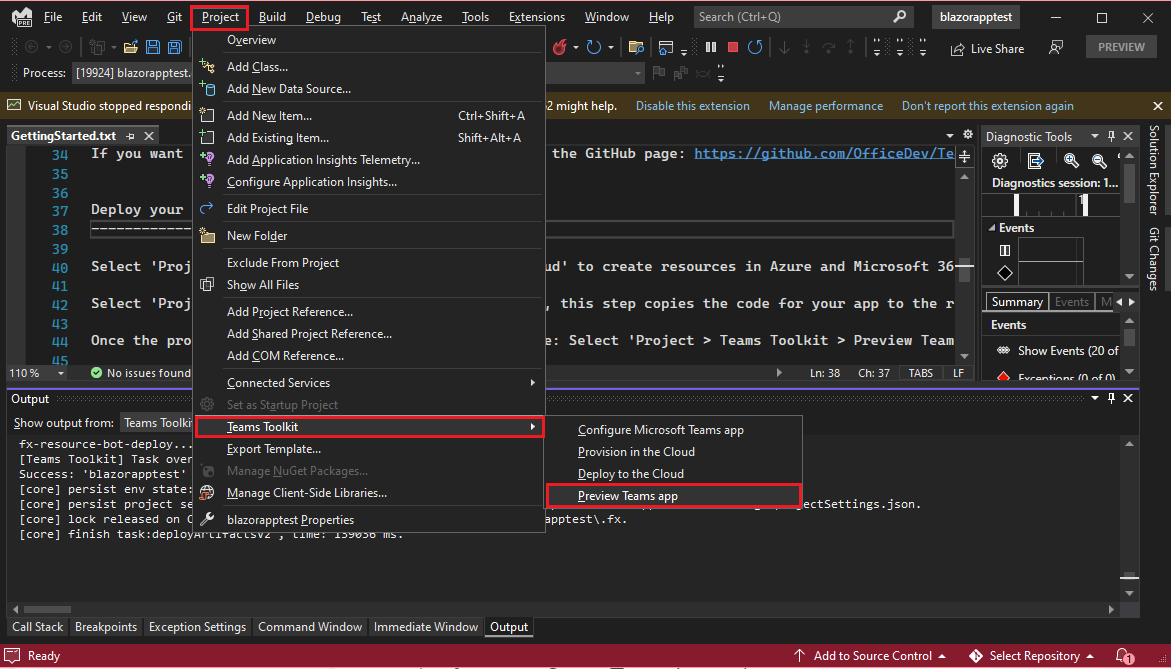
You’ve learned to create, build, and run Teams app with tab capability. The final step is to deploy your app on Azure and Preview on Teams. It includes the following:
Use Teams Toolkit to create your first project. The toolkit takes you through a series of pages to create and configure your Teams app project:
Creating a new project page: You select the project type.
Configure your new project page: You enter the project details.
Create a new Teams application page: You select the Teams app capabilities.
To create your bot project workspace
Open the latest version of Visual Studio.
Select Create a new project.
The Create a new project page appears.
Select the project details.
Select the project type:
Select Microsoft Teams from All platforms dropdown list.
Select Microsoft Teams App as the template.
Select Next.
The Configure your new project page appears.
Configure the new project details.
Select the following project configuration:
Enter a suitable name for your project.
Note You can note that the project name you enter is automatically filled in as the Solution name also. If you want, you can change the solution name with no affect on project name.
Select the folder path where you want to create the project workspace.
Enter a different solution name, if you want.
Check the option to save the project and solution in the same folder, if you want. For this tutorial, you don’t need this option.
Select Create.
The Create a new Teams application page appears.
Select Teams app feature.
Select app feature:
Select the Bot app as the capability for your app.
Select Create.
Your Teams bot app is created in a few seconds.
A quick recap of creating a Teams bot app.
Take a tour of the source code for Teams bot app
After project creation, you have the components to build a basic personal app. You can view the project directory structure in the Solution Explorer area of the latest Visual Studio.
Teams Toolkit creates a scaffolding for your project based on the capabilities you selected. Among other files, Teams Toolkit maintains:
Folder name Contents
App icons The app icons are stored as PNG files in color.png and outline.png.
Properties/manifest.jsonThe app manifest for publishing through the Developer Portal for Teams is stored inProperties/manifest.json.
Controllers/BackendController.csA backend controller is provided in Controllers/BackendController.cs for assisting with authentication.
TeamsFx.cs and JS/src/index.jsThe content is used for initializing communications with the Teams host.
You can add backend functionality by adding other ASP.NET Core controllers to your application.
Build and run your first bot app
3 minutes remaining
To build and run your app locally:
Select Project > Teams Toolkit > Configure Your Microsoft Teams.
Select your Microsoft 365 account or Add an account to sign in.
Use ngrok or Command prompt to create a tunnel to your locally running web server’s publicly available HTTPS endpoints. Run the following command in ngrok:
Bash Copy
ngrok http -host-header=localhost 2544
Select Debug > Start Debugging or select F5 to run your app in debug mode.
Learn what happens when you run your app locally in the debugger.
When you select F5, Teams Toolkit:
Registers your application with Azure Active Directory.
Registers your application for “sideloading” in Teams.
Starts your application backend running locally.
Starts your application front-end hosted locally.
Starts Teams in a web browser with a command to instruct Teams to side load the application (the URL is registered inside the application manifest).
Note When you run the app for the first time, all dependencies are downloaded, and the app is built. A browser window automatically opens when the build is complete. This process can take 3–5 minutes to complete.
Your web browser starts to run the app.
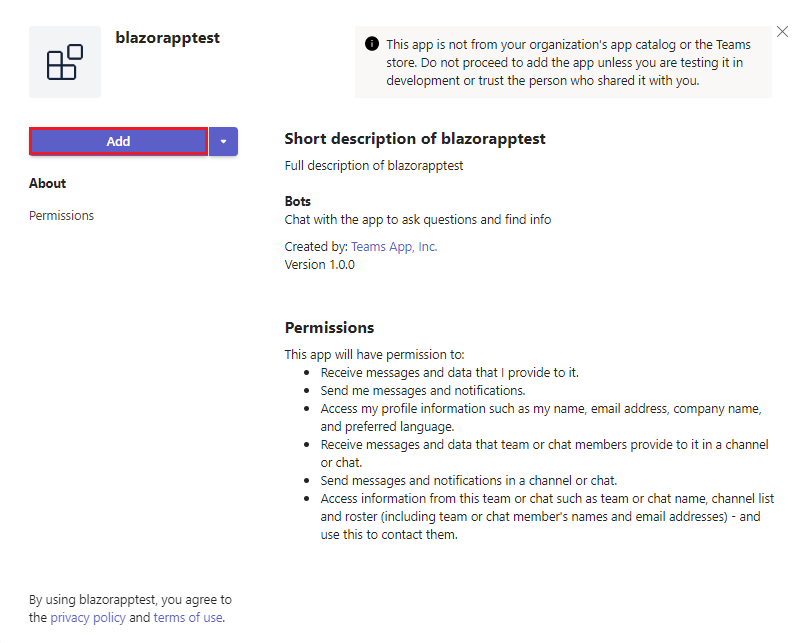
Select Add when prompted to sideload the app onto Teams on your local machine.
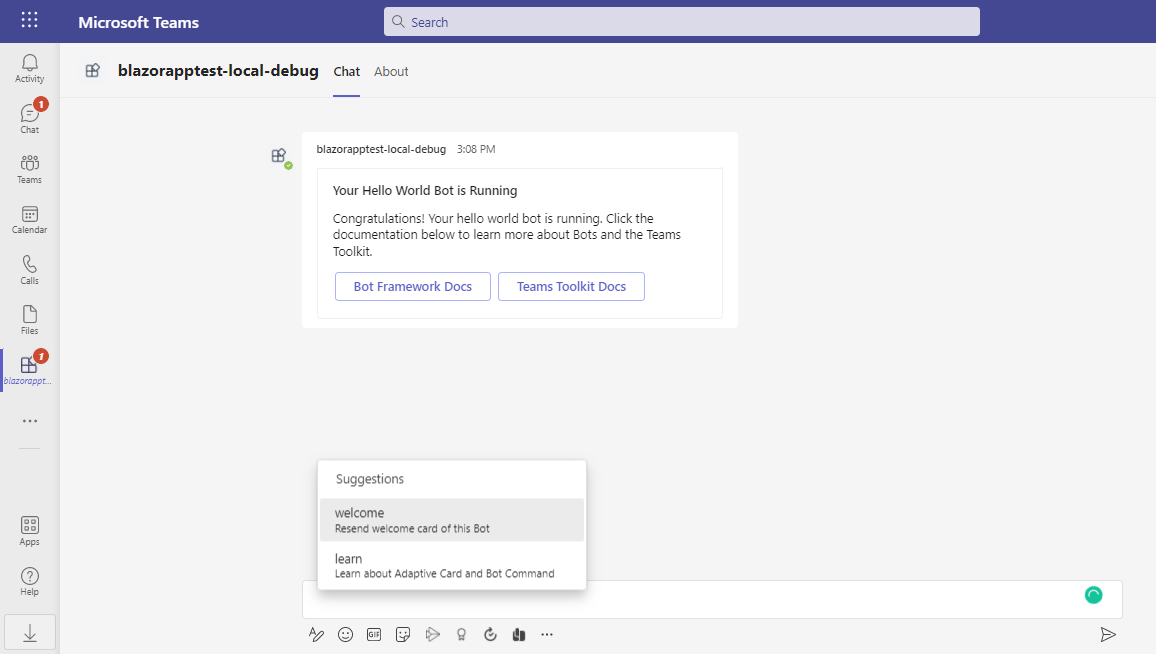
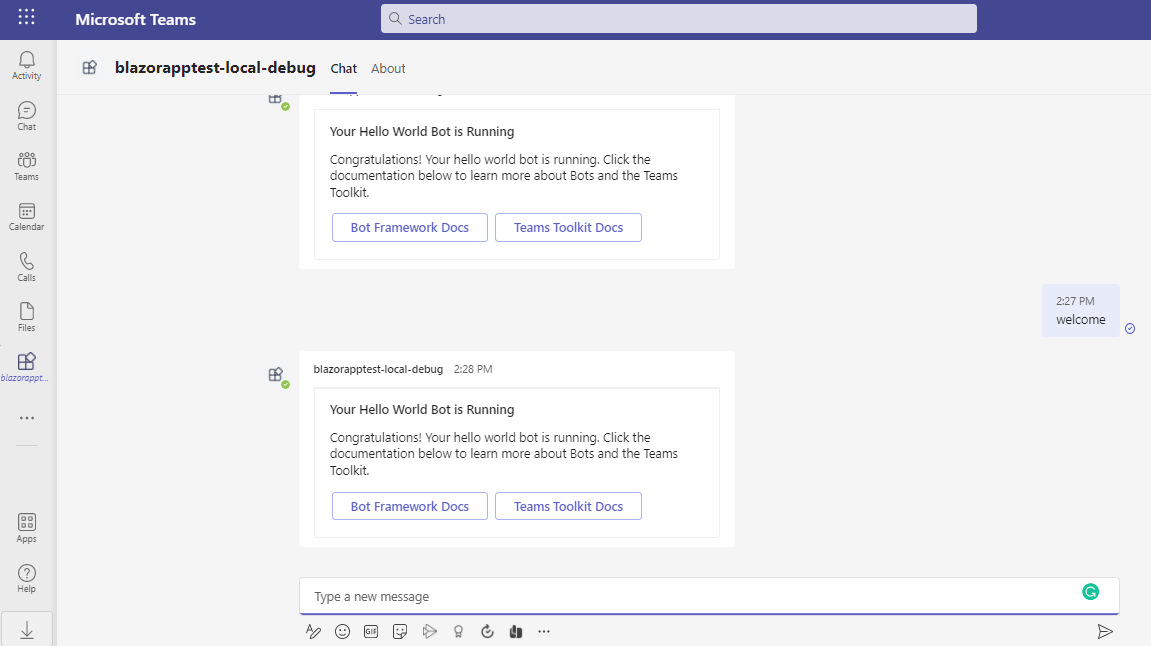
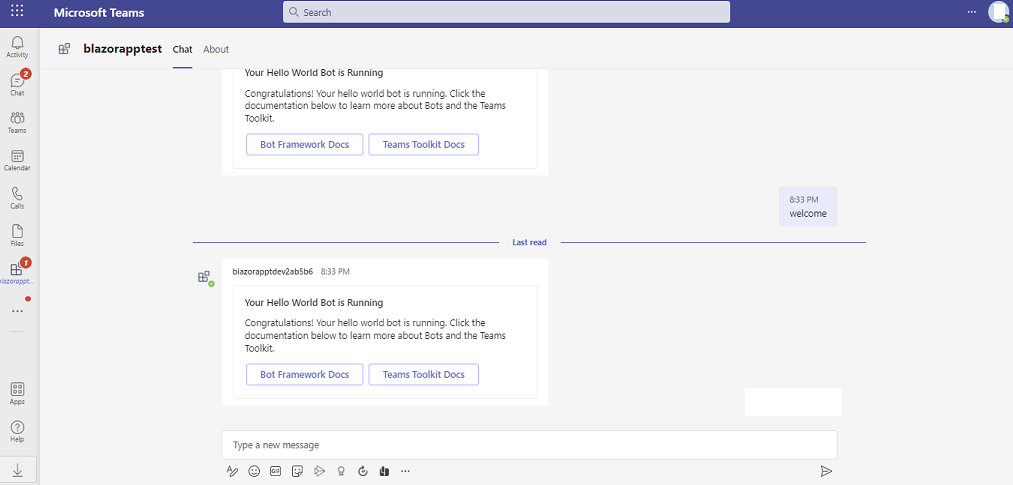
Now the bot is successfully running on Teams! After the app is loaded, a chat session with the bot opens.
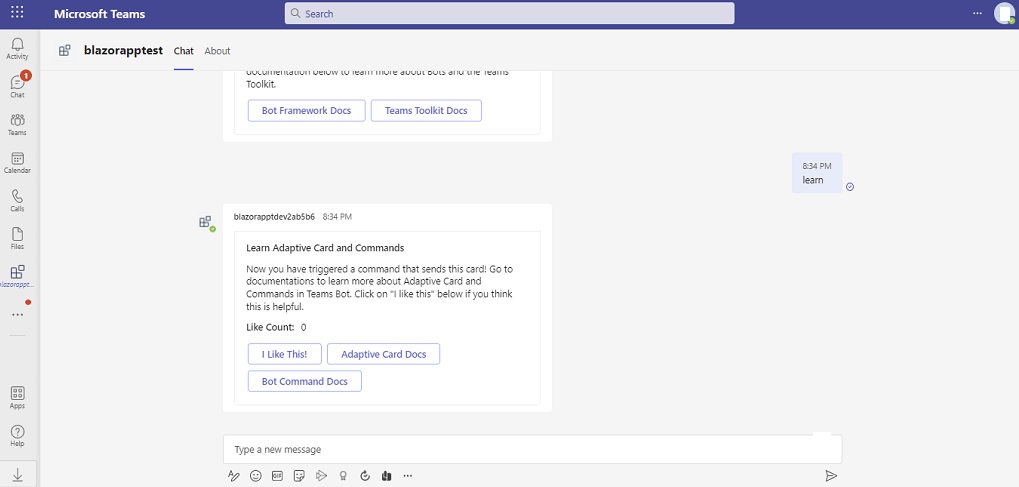
You can type welcome to show an introduction card, and type learn to go to adaptive card and bot command documentation.
You can do normal debugging activities, such as setting breakpoints, as if it were any other web application. The app supports hot reloading. If you change any file within the project, the page will be reloaded.
Learn how to troubleshoot if your app doesn’t run locally.
To successfully run your app in Teams, ensure that you’ve enabled sideloading in your Teams account. You can learn more about sideloading in the Prerequisites section.
Preview your first bot app
2 minutes remaining
You’ve learned to create, build, and run Teams app with bot capability. The final step is to deploy your app on Azure and Preview on Teams. It includes the following:


Comments
Post a Comment